Tuesday, February 28, 2006
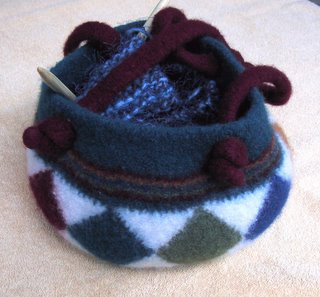 Well, the Knitting Olympics and Crocheting Olympics are past. I'm pleased to report that I was able to complete all my items.
My first event was the Felted Entrelac Tote from Knit Picks. Entrelac was always a technique I thought must be difficult. I found out, like most knitting techniques, it isn't difficult if you just take it a step at a time.
Since that project went faster than I anticipated I added a second knitting event., The Edgar Scarf from Knitty.com.

Being a complete Fiber-a-holic, I also signed on to the Crochet Olympics and elected to combine my love of crochet with the satisfaction of charity work. I set the goal of making 8 pair of fingerless mitts for CIC (Children In Common). This is a group of women who make warm things for the children in orphanages in the former Soviet Union.
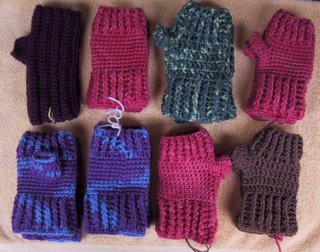
Today, I'm working on another Edgar Scarf this time in a warm color. Up here in Bellingham, WA it is a cold and dreary day and the warm colors seem a cheerful bright spot.
Tuesday, February 14, 2006
TOTE OF A 100 ENDS
That's what they should have named this tote instead of the Felted Entrelac Tote. I completed the bag portion of the FET. It will probably take me two days just to weave in all the @#$%&* ends.
I will probably NEVER knit this pattern again, just because of the ends. However I'm very glad that I knit it this ONE time. I always wondered about entrelac and thought it looked impossibly complicated. Well, it isn't.
How long do you suppose it will take to knit 10 stitch I-Cord 40 inches long? Twice. Yikes 5 stitch is the widest I've done in the past, so this will be an adventure as well.
Monday, February 13, 2006
Day 4
I now have 5 pair of mitts crocheted, I really like the Post Stitch Mitts. I even have the ends woven in and the pairs tied neatly together. I learned a lesson about weaving in ends shortly before Christmas when I knit 11 pair of slippers. I left all the ends and had a fun (not) time weaving them all in one night.
Speaking of ends, yikes the Felted Entrelac Tote, is a mess of ends. I am through with the colored rectangles.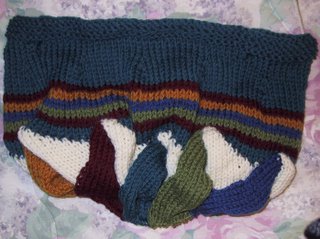
Funny all this time I thought they were diamonds, but no the pattern says they are rectangles. And they really are. So this evening, while bouncing between the Olympics and the Westminster Dog Show, I'll work on the set of white triangles.
It is looking like I will finish the tote with several days to spare. So I think I'll dye some yarn and knit the Edgar Scarf from Knitty.com as my second event.
Speaking of ends, yikes the Felted Entrelac Tote, is a mess of ends. I am through with the colored rectangles.

Funny all this time I thought they were diamonds, but no the pattern says they are rectangles. And they really are. So this evening, while bouncing between the Olympics and the Westminster Dog Show, I'll work on the set of white triangles.
It is looking like I will finish the tote with several days to spare. So I think I'll dye some yarn and knit the Edgar Scarf from Knitty.com as my second event.
Sunday, February 12, 2006
Knitting and Crochet Olympics - Day 3
Here it is day 3, and I've fallen behind in the knitting event. Been spending too much time on the crocheting event. I've come up with a second fingerless mitt pattern and I like it much better. I posted it a few minutes ago.
My Crochet Olympics event is to crochet 8 pair of mitts for CIC [Children in Common]. I have 3.5 pair [7 mitts] completed. YES, even the ends woven in.
I'm going to switch over to my Knitting Olympics event this evening. I'm to the triangles on the FET. Good grief, I'll have to pay attention.
Knit [or crochet] on!
Post Stitch Mitts - Pattern

POST STITCH MITTS
Sizes: M [L]
Hand measured at knuckles 7.5inches [8.5 inches]
Materials:
Worsted weight about 2.15 [2.25] ounces
H and I crochet hooks
Gauge: 6 sc = 2 inches. 7 sc rows = 2 inches
Note: Ch 2 and ch 3 at beginning of rounds counts as hdc and dc.
Foundation chain: With I hook, ch 26 [28], join with slip stitch in first chain.
Rnd 1: Ch 2, hdc in each ch, ending slip stitch around ch 2, as if to front post.
Rnd 2-7: Ch 2, *bphdc, around next hdc, fphdc around next hdc*, repeat ending with slip stitch around ch 2, as if to front post. On rnd 7 sl st in ch 2.
Rnd 8-13: Ch 1, sc in same st, sc in each st, join with sl st in first sc. Mitt should measure approximately 4-5 inches from foundation chain.
Rnd 14: Ch 1, sc in same st, sc in next 10 [11] sts, ch 5 [6], skip 5 [6] sc, sc in 10 [10] sc. Join with slip stitch in first sc.
Rnd 15-16: Ch 1, sc in same st, sc in each st and ch, join with sl st in first sc.
Rnd 17: Ch 2, hdc in each st, ending slip stitch around ch 2, as if to front post.
Rnd 18-21: Ch 2, * bphdc around next st, fphdc around next dc, repeat around ending with slip st around ch 2, as if to front post. Should measure approximately 7-8 inches from foundation chain. Mitt should reach to the first joint of the little finger, if it doesn’t add another round of back and front posts.
Optional Thumb:
Using a size H hook
Rnd 1: Join yarn with a sc in the first skipped sc of Rnd 13. Space 12 [14] sc around opening, 1 sc in each of the 5 [6] skipped sts and the unused loop of ch, sc in the sides of the sc in rnd 14.
Rnd 2-3: Ch 2, 5 [6] hdc, 3 sc, 3 [4] hdc, join with slip stitch in top of ch 2.
Rnd 4: Ch 2, 3 [4] hdc, 6 sc, 2 [3] hdc, join with slip stitch in top of ch 2.
Rnd 5: Slip stitch in each st around. Fasten off. Weave in ends.
Mitt length can be adjusted by working more rounds on cuff (Rnds 1-7).
Saturday, February 11, 2006
Knitting Olympics day 2
So far the commercials on the Olympics have been better than the Super Bowl ones.
Got two pair of crocheted mitts completed, guess I'm ready to switch over to my knitting project. Last night I got to the triangles on the FET, only knitted one before I gave out for the day.
Got two pair of crocheted mitts completed, guess I'm ready to switch over to my knitting project. Last night I got to the triangles on the FET, only knitted one before I gave out for the day.
Friday, February 10, 2006
Knitting Olympics
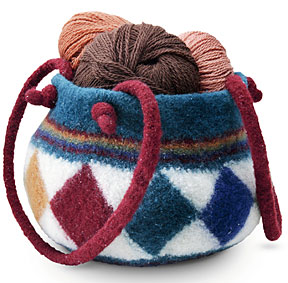
Well I got the cast on and 8 rows done before I had to set the Felted Entrelac Tote (FET) aside. I can't talk and count at the same time, and was visiting with a friend. I don't get to visit her very often, so today was a treat. I think tonight I will make some real progress on the FET.
That's Knit Picks photo of the FET. Hope mine turns out half as nice. Entrelac is a new technique for me.
Knit on!
Tuesday, February 07, 2006
Today is one of those days!
Today is one of those days. I'm so glad that felting hides a multitude of sins.
I'm knitting a mitered square for a felted bag, first I notice I've dropped a stitch a dozen of so rows back. So I use a crochet hook to pick it back up. Well, it was really tight, but what the heck felting hides........you know.
So I'm knitting along and get to the center where you decrease and see that a couple rows back, I didn't decrease. Well, what the heck felting hides................you know.
I will be REALLY glad to get this square finished and maybe the next one will go smoother.
This is my first time to try felting a mitered square. Hope it doesn't get all wonky. Stay tuned and I'll let you know.
ps: Finished the troublesome bag except for felting. I won't be making another one using this idea. But think I will try this one: http://home.pacbell.net/kapleo/blog/domesticspherepatterns.html
Thursday, February 02, 2006
DYEING A CAUTIONARY TALE
I said I’d post instructions for the way I dye yarn and I will but first a Cautionary Tale.
I started out with Kool-Aid and made some nice smelling brightly colored yarn. Then I branched out to Wilton’s food colors. Lots of unexpected colors with it as the colors separated and I ended up with multicolor yarns., That was fine with me as my preference is for multicolors.
Well, I knitted myself some socks and proudly wore them with my Birks. After a few wearings, what to my wondering eyes should appear? My socks were becoming stripes of bright colors and others of washed out colors. Well, slow on the uptake as I can be, I didn’t figure it out until I was camping in Toppenish WA. I washed my lovelies and laid them on the picnic table on a towel to dry. When I went to check on them, aghast someone had switched my lovelies for some yellowish beige uglies. But, when I picked them up I saw that the side that had been next to the towel was still stripes of brights and dulls. Food colors are not light fast. I don’t care how much vinegar you use to set the color, if your completed item is going to be exposed to light expect the color to fade more and more.
What am I going to do with the half faded uglies you may ask, well if the sun ever shines in NW Washington again I’m going to see if the sun can fade the other side to match. If our sun isn’t bright enough in Bellingham, I’m going to Toppenish again in September. Have uglies will travel.
DYEING FOR SOME FUN How to Dye


Mind you this is my way. There are as many ways to dye as there are dyers. So if this way seems strange or not the way you do it or the way your Aunt Sally does it, don’t sweat the small stuff. It’s supposed to be fun. I don’t dye it to sell, I have swapped dyed for undyed yarn, but that’s as far as this enterprise has gone or will go. I’ve had a blast playing around and have made some pretty things for CIC and for my felting projects.
Instructions for multicolor dyeing.
Materials:
100% Wool (you can dye some other fibers but I’ve only done it with wool)
Large pot
Dawn (or similar detergent)
Rit Dye 2 or more colors
Wind:
Wind a skein of Lion Brand Fishermen’s Wool (or wool of your choice) into a hank. You can use a swift, a niddy noddy, a chair or a willing person’s hands. I’m fortunate enough to have a wooden niddy noddy my dad made for me. There are online instructions to build a niddy noddy out of PVC.
http://www.doctordirt.com/blog/niddy.html
Tie:
Loosely tie the hank with a figure eight in several places. I like to tie mine with acrylic yarn. It doesn’t take the dye and it is easy to find when it is time to remove the dyed hanks from the dye bath.
Soak:
Started the yarn soaking in a large pot filled with tepid water with a little Dawn dish washing detergent (not dishwasher detergent). Let it soak overnight. I tried only letting the yarn soak an hour or so, but found out I get better results by soaking overnight.
Rinse:
It’s morning and the yarn has been soaking all night. Drain off the yucky (scientific term) water and refill with tepid water and Dawn. Try to match the temperature of the water and don’t agitate, you don’t want your yarn felting before you have a chance to knit or crochet with it. You want to get rid of the lanolin in the Fishermen’s Wool so it will take the dye nicely.
Dyeing:
The yarn is clean and wet. I like to dye my yarn more than one color, so these instructions are for two color dyeing. Fill a pot with about 6 inches of tepid water. Add a teaspoon or two of Rit powder to the water. Roll the package to keep the rest of the dye for another project. Stir until the powder is dissolved. Drape the hank over a dowel, wooden spoon or whatever you can find to hold about half the yarn out of the dye bath. I use rubber bands to hold the yarn to the dowel if necessary. Turn on the burner to low and simmer the yarn about 30 minutes. Stirring occasionally. You can lift the yarn to check the progress, wet is darker than dry. Let the yarn cool, then lift out and rinse, rinse, rinse until the water runs clear. Wash your pot thoroughly, so you don’t contaminate your new color with traces of the first. Repeat with the undyed portion of the hank. Once both sections are dyed and rinsed I wrap the yarn in an old towel to absorb as much water as possible. Then hang to dry.
A note about safety:
Lots of people feel it is best once you use pots for dyeing to not use them for food preparation, hence the popularity of dyeing with Kool-Aid and Wilton’s. I found them fun to dye with, but not light fast. According to the Rit powder MSDS (material safety data sheet) it isn’t necessary to have special pots. You can read the MSDS for yourself at ritdye.com. Just don’t drink the dye or breathe the powder or get it in your eyes. Same holds true for Kool-Aid if that’s what you decide to use.
When I finish I wash the pot with hot sudsy water and a little bleach. If you are more comfortable using pots dedicated to dyeing do so. My sons and I used our kitchen pots for tie dyeing in the 70s, and none of us ever got sick. Now some people might dispute our mental faculties, but that’s another story.
Well, now I’ve done it! I signed up for both the Knitting Olympics and the Crochet Olympics. Guess we know what I’ll be doing February 10-26.
For my knitting event I’m going to knit the Felted Enterlac Tote from Knit Picks.
http://www.knitpicks.com/Projects/Projects_Display_Yarn.aspx?itemid=50406220&yarnid=5420103
Enterlac is a technique I’ve always thought I’d like to learn. So come February 10th I’ll be casting on.
Then the idea of a Crochet Olympics came up and of course I couldn’t let that pass me by.
So I decided to use the Crochet Olympics to motivate me to crochet mitts for the CIC February March challenge. I’ll be using a pattern I came up with a few years ago. See my Fingerless Mitts post.
Fingerless Mitts Pattern
Fingerless Mitts
Copyright 2002, by Suzetta Williams. All Rights Reserved
These are handy because you can slip your thumb out and shove the mitts up your wrist, no more lost gloves.
Materials:
Worsted weight
G hook
Foundation: Chain 32
Row 1: Hdc in third chain from hook and in each chain to end. Chain 2 turn. {30 hdc}
Rows 2-7: Hdc in back loop only (BLO) of each hdc of prior row. Chain 2 turn
Row 8: Hdc in BLO first 16 hdc of row 7, chain 5, skip 5 hdc and hdc in BLO of remaining 9 hdc of row 7. Chain 2 turn.
Row 9-16: Repeat row 2, working hdc in each chain of chain 5. After completing row 16 do not chain 2, fasten off leaving a tail long enough for sewing seam.
Finishing: Sew seam catching BLO of row 16 to foundation chain.
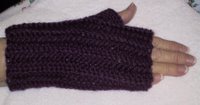
Optional thumb:
Row 1: Attach yarn with a sc in the first skipped st of row 7. Sc in each skipped st of row 7, sc in side of hdc of row 8, sc in unused loop of chain of row 8, 2 sc in side of hdc row 8. Join with a slip st in first sc. Ch 1, DO NOT TURN. (13 sc)
Row 2-5: Sc in each sc around. Join with a slip st in first sc. Ch 1, DO NOT TURN. (13 sc
Copyright 2002, by Suzetta Williams. All Rights Reserved
These are handy because you can slip your thumb out and shove the mitts up your wrist, no more lost gloves.
Materials:
Worsted weight
G hook
Foundation: Chain 32
Row 1: Hdc in third chain from hook and in each chain to end. Chain 2 turn. {30 hdc}
Rows 2-7: Hdc in back loop only (BLO) of each hdc of prior row. Chain 2 turn
Row 8: Hdc in BLO first 16 hdc of row 7, chain 5, skip 5 hdc and hdc in BLO of remaining 9 hdc of row 7. Chain 2 turn.
Row 9-16: Repeat row 2, working hdc in each chain of chain 5. After completing row 16 do not chain 2, fasten off leaving a tail long enough for sewing seam.
Finishing: Sew seam catching BLO of row 16 to foundation chain.

Optional thumb:
Row 1: Attach yarn with a sc in the first skipped st of row 7. Sc in each skipped st of row 7, sc in side of hdc of row 8, sc in unused loop of chain of row 8, 2 sc in side of hdc row 8. Join with a slip st in first sc. Ch 1, DO NOT TURN. (13 sc)
Row 2-5: Sc in each sc around. Join with a slip st in first sc. Ch 1, DO NOT TURN. (13 sc


